Overview
Fracture mechanics is a methodology that is used to predict and diagnose failure of a part with an existing crack or flaw. The presence of a crack in a part magnifies the stress in the vicinity of the crack and may result in failure prior to that predicted using traditional strength-of-materials methods.
The traditional approach to the design and analysis of a part is to use strength-of-materials concepts. In this case, the stresses due to applied loading are calculated. Failure is determined to occur once the applied stress exceeds the material’s strength (either yield strength or ultimate strength, depending on the criteria for failure).
In fracture mechanics, a stress intensity factor is calculated as a function of applied stress, crack size, and part geometry. Failure occurs once the stress intensity factor exceeds the material’s fracture toughness. At this point the crack will grow in a rapid and unstable manner until fracture.

Fracture mechanics is important to consider for several important reasons:
![]() Cracks and crack-like flaws occur much more frequently than might be expected. Cracks can either pre-exist in a part, or they can develop due to high stress or fatigue.
Cracks and crack-like flaws occur much more frequently than might be expected. Cracks can either pre-exist in a part, or they can develop due to high stress or fatigue.
![]() Typically, as the strength of a material increases, fracture toughness decreases. The intuition of many engineers to prefer higher strength materials can lead them down a dangerous path.
Typically, as the strength of a material increases, fracture toughness decreases. The intuition of many engineers to prefer higher strength materials can lead them down a dangerous path.
![]() Ignoring fracture mechanics can lead to failure of parts at loads below what is expected using a strength-of-materials approach.
Ignoring fracture mechanics can lead to failure of parts at loads below what is expected using a strength-of-materials approach.
![]() A failure due to brittle fracture is rapid and catastrophic and provides little warning.
A failure due to brittle fracture is rapid and catastrophic and provides little warning.
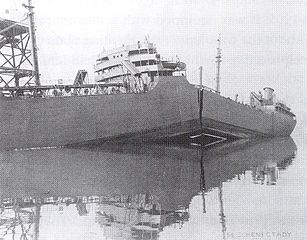
The image below shows the SS Schenectady tanker, one of the World War II Liberty Ships and one of the most iconic fracture failures. The Liberty ships all had a tendency to crack during cold weather and rough seas, and multiple ships were lost. Approximately half of the cracks initiated at the corners of the square hatch covers which acted as stress risers. The SS Schenectady split in two while sitting at dock. An understanding of fracture mechanics would have prevented these losses.
Stress Concentrations Around Cracks
Cracks act as stress risers and cause the stress in the part to spike near the tip of the crack. As a simple example, consider the case of an elliptical crack in the center of an infinite plate:
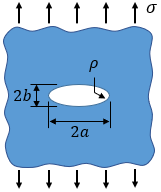
The theoretical value of stress at the tip of the ellipse is given by:
where σ is the nominal stress and ρ is the radius of curvature of the ellipse, ρ = b2/a.
As the radius of the crack tip approaches zero, the theoretical stress approaches infinity. This infinite stress is known as a stress singularity and is not physically possible. Instead, the stress distributes over the surrounding material, resulting in plastic deformation in the material at some distance from the crack tip. This region of plastic deformation is called the plastic zone and is discussed in a later section. The plastic deformation causes blunting of the crack tip which increases the radius of curvature and brings the stresses back to finite levels.
Because of the stress singularity issues that arise when using the stress concentration approach, and because of the plastic zone that develops around the crack tip which renders the stress concentration approach invalid, other methods have been developed for characterizing the stresses near the tip of the crack. The most prevalent method in use today is to calculate a stress intensity factor, as discussed in a later section.
Looking for Fracture Calculators?
We have a few to choose from:
· Fracture Mechanics Calculator
· Fatigue Crack Growth Calculator
· Fracture Materials Database

Modes of Loading
There are three primary modes that define the orientation of a crack relative to the loading. A crack can be loaded in one mode exclusively, or it can be loaded in some combination of modes.
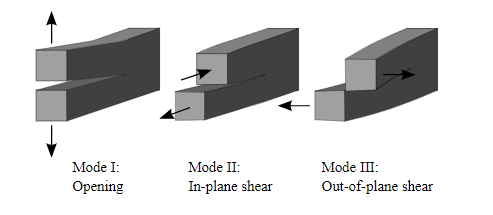
The figure above shows the three primary modes of crack loading. Mode I is called the opening mode and involves a tensile stress pulling the crack faces apart. Mode II is the sliding mode and involves a shear stress sliding the crack faces in the direction parallel to the primary crack dimension. Mode III is the tearing mode and involves a shear stress sliding the crack faces in the direction perpendicular to the primary crack dimension.
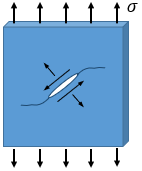
Engineering analysis almost exclusively considers Mode I because it is the worst-case situation and is also the most common. Cracks typically grow in Mode I, but in the case that the crack does not start in Mode I it will turn itself to become Mode I, as illustrated in the figure below.
Stress Intensity Factor
The stress intensity factor is a useful concept for characterizing the stress field near the crack tip.
For Mode I loading, the linear-elastic stresses in the direction of applied loading near an ideally sharp crack tip can be calculated as a function of the location with respect to the crack tip expressed in polar coordinates:
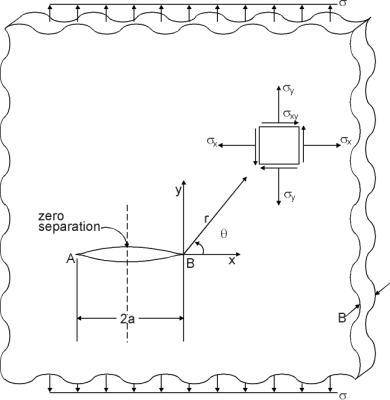
Image Source: USAF Damage Tolerant Design Handbook
A term K, called the stress intensity factor, can be defined in the form:
where the units are either ![]()
The stress intensity factor for a Mode I crack is written as K I. (From this point forward, it is assumed that all stress intensity factors are Mode I for reasons discussed previously, so the stress intensity will be denoted simply as K. Using the equation for the stress intensity factor, the original equation for stress near the ideally sharp crack tip can be re-written as:

where a is the crack size and Y is a dimensionless geometry factor that is dependent on the geometry of the crack, the geometry of the part, and the loading configuration.
It is important to note that because equations describing the linear-elastic stress field were used to develop the stress intensity factor relationship above, the concept of the stress intensity factor is only valid if the region of plastic deformation near the crack tip is small. This will be discussed in more detail in a later section.
Stress Intensity Factor Solutions
The difficult part of calculating the stress intensity factor for a specific situation is finding the appropriate value of the dimensionless geometry factor, Y. This geometry factor is dependent on the geometry of the crack, the geometry of the part, and the loading configuration. A classic case is plate with a crack through the center, as shown below:
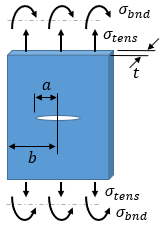
The stress intensity factor for a specific situation can be found through numerical methods such as Finite Element Analysis (FEA). However, solutions for many cases can be found in the literature. Solutions for some common cases, including the case shown above, can be found on our Stress Intensity Factor Solutions page.
Superposition for Combined Loading
Because the concept of the stress intensity factor assumes linear elastic material behavior, the stress intensity factor solutions can be combined by superposition to find solutions to more complex problems. For example, the stress intensity factor solution for a single edge cracked plate in tension can be combined with the solution for a single edge cracked plate in bending, as shown in the figure below.
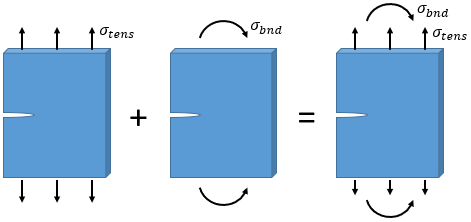
The stress intensity factor for the combined solution is calculated as:


